Cute as a Cupcake

Happy Friday to everyone!
Quiet week here...attempting to use up some of the scraps I have collected...which is now a drawer and overflowing.  It's a bad habit...I keep every little scrap...never know when I will just need a small square of something!  Know the feeling?

Anyhow, I ended up using new paper for today's card.  Didn't have any scraps in the colors or theme that I wanted :)  I followed the sketch at Sweet Sunday Sketch for this card.
I used the inspirational photo at the Pinspirational Challenge for my colors.  I really wanted the colors to pop and be completely different than any color combo I have used in the past.  So I went bright!  I loved this paper when I picked it up from the discount racks a few weeks ago.  Knew it would be perfect for a birthday card.  I was right!

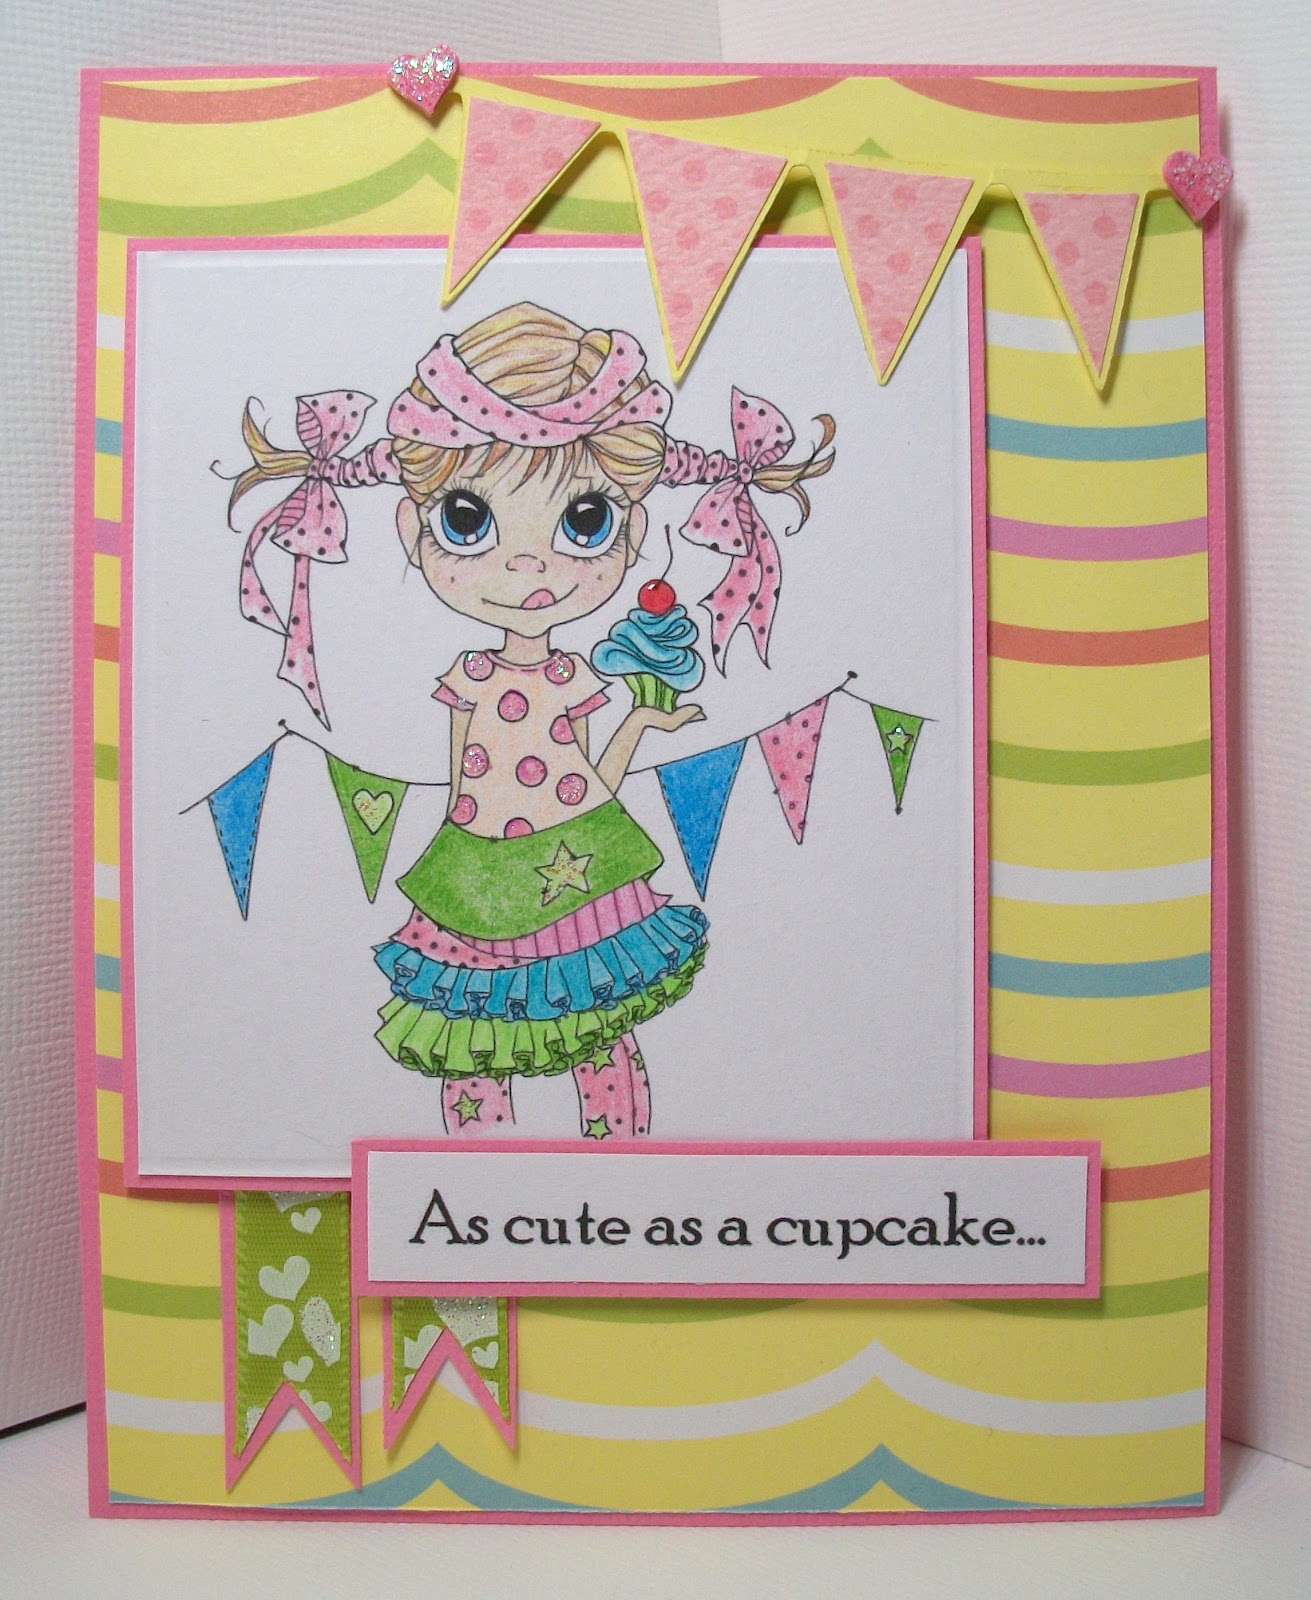
The adorable little cupcake girl is Party Hardy from Saturated Canary.  She's colored with pencils in all those bright colors.  I love the Saturated Canary images.  All the layers are so much fun to color.  I don't feel like they all have to match.  They can be mish-mash, random colors pulled from the background.  Makes them that much more fun!
I added a dot of glossy accents to the bright red cherry and some glitter details around the image.

The banner is cut from the cricut Birthday Bash cartridge.  I did use a scrap on the banner!  That pink paper...yeah it was a scrap about 1 1/2 inch by 3 1/2 inch!  Perfect size to make pennants with!
I punched out and layered a bunch of the little hearts on the ends of the banner then glittered them.

The flags under the image are pieces of ribbon.  I've had this green heart ribbon forever!  I loved it when I bought it...but lime green is not a very popular color for me to use :)
The flags and the sentiment are framed in pink.  Then I completed the inside!
 It's a lot simpler of a card than I had originally planned it to be...but I think stepping out of my color comfort zone makes up for the lack of details :)

This card is entered in the following challenges:
    Sweet Sunday Sketch #157
    Saturated Canary #16-Happy Birthday
    {Pin}spirational Challenge #4-Photo Inspiration
    Paper Makeup #33-Birthday
    The Pink Elephant #145-Yellow
    Celebrate the Occasion #60-Happy Birthday-Must use Ribbon
    Ladybug Crafts #59-Birthday
    Ribbon Carousel #50-Anything Goes
    Totally Papercrafts #114-Saturated Colors

Have a great weekend!!!

13 Fabulous Comments:

April Showers

I've seen this topic come up a lot in the challenges this month.  It's one of those themes that I don't ever think of to apply to a card so I have just been skipping over them, until I saw this sentiment at Ginger's House.  It seemed perfect for a card, so I had to use it!
It's not an elaborate card...very few details...but it was fun putting together.  I'm apparently in to trying new techniques and such lately...this week at Friday Mashup the suggested technique is "Ghosting."  All the guides say to use the Versamark stamp pad in order to get the ghosted affect.  Well, since I don't have a Versamark stamp pad...I started using what I had to see if it would work.  The only way that really gave me a decent result was when I used a clear embossing pad to stamp my rain drops.  Once I had swiped my color ink pads over my photo paper, I used a paper towel and rubbed really hard to get the ink to wipe off the rain drop stamp.  It worked pretty well...it's certainly not as beautiful as what the design team did at Friday mashup...but I'll take it :)
The sun and the tulips are cut from my Create-a-Critter cartridge and the clouds are from Everyday Paper Dolls.  I added some stitching around the edges with a colored pencil and then put some glossy accents around the bottom of the clouds.

I used an absolutely adorable image from Saturated Canary-Let it Rain.  She's colored with my pencils and I added some glossy accents around her as well since she's standing in the rain :)
I took the sentiment from Ginger's House and retyped it out into a shape that would fit on my card.
The hearts coming out of the cloud was an idea I got from a card Karen Giron recently made...I follow her blog religiously...every card she makes is absolutely beautiful!...I get jealous :)

This card is entered in the following challenges:
    Friday Mashup #55-I ain't afraid of no ghost!
    Cardz TV #106-April Showers
    Saturated Canary #15-April Showers
    Cardmadfairy's Digi Days-April Showers
    Raise the Bar #101-Cloudy Skies

Thanks for stopping by!

9 Fabulous Comments:

Butterfly Hugs

Happy Tuesday!  I hope everyone is well.
I am sad to say that this week is my last week as guest designer over at Tuesday Throwdown.  I have had so much fun creating with them and I'm bummed that it is over.  Thank you so much to Davi for giving me this opportunity!  It definitely helped get me out of my comfort zone!

This weeks challenge is "Use Some Sparkle!"  One thing I love to use is glitter so this challenge was perfect for me!!
Our sponsor this week is The Cutting Cafe.  I used the butterflies from the Animal and Bug Love Stamp Set.  I colored them in with my pencils and added lots of glitter to the hearts and their wings!
For the corner frame, I cut out a doily with my cricut, then a scallop circle from my Lacy Labels cartridge.  The top layer is the butterfly wording background from the Animal and Bug Love set.  I washed it out so that it looked more like a subtle background than a bold statement.  It could have been a little darker, but I think it worked out fine.
The last touch was adding gems around the scallop circle and the frame of the card!  It was a pretty simple card but I think it turned out so cute!  Doing the edge of the card as the scallop cutout was new for me.  I've seen it so many times on other cards and thought it was absolutely beautiful, so I wanted to try it.  I need to work on sizing and such for it, but I think I will be doing that more often :)

I hope you will join us this week at Tuesday Throwdown!  You never know, you might be the next guest designer!!

This card is entered in the following challenges:
    Sketches by Carly #54
    The Paper Shelter #60-Wings and Things
    Crafty Ribbons #17-Things with Wings
    Pixie Dust Studio #123-Texting
    2 Sisters Challenge #88-Use a Digital Image
    Our Creative Corner-Butteflies
    Stamptacular Sunday #160-Loaded with Layers

Thanks for stopping by!

11 Fabulous Comments:

Special Mom Cards

Hello and happy Friday to everyone!
I'm sharing 2 cards with you today.  It's been a productive week for me and I have loved every single card that I have produced.  I think they have been some of my best cards yet!

For this first card, I following the sketch at Mojo Monday this week.
Isn't that just so cute!!  The flower image is from Melonheadz.  I took the flower part of the image and turned it into a cut file and then cut out 3 of them in staggered layers.  The center of the little flowers is a blue brad that I covered with some light blue stickles.
The white panel is embossed with my D'vine Swirls folder and then mounted on green card stock with a scallop cut border from Bird's Cards.  I added some blue dots to the corner and at the base of each detail on the border.

The image is colored with my pencils.  I added a little white bow and some light blue stickles to the petals.
This card is entered in the following challenges:
    Mojo Monday Sketch #237
    Paper Pretties-Embossing
    Ribbon Carousel #49-Color-a-licious

My second card follows the sketch at Simon Says this week.
I was a little worried about using such a dark teal paper...it just seemed so dark and I wasn't sure if I'd be able to brighten it up!  But I think it turned out great.  The image is Ava Flowers from Bugaboo, again colored in with my pencils.  I punched out some daisy's to match the flowers in the image and added some clear gems to the centers.

I added a strip of blue glitter ribbon.  At the time of choosing that ribbon, I didn't realize how glittery it was...but by the time the card was complete my desk, my hands, my floor, the card were completely covered in glitter!  Quite a mess...but I love glitter and I love this ribbon :)

This card is entered in the following challenges:
    Simon Says-Sketch
    Prairie Fairy Fridays #77-Anything with Flowers

Thanks for stopping by and have a great weekend!!

4 Fabulous Comments:

Indulge

It's been a busy day for me today!  While I haven't posted anything, I've made several cards!  It feels so good getting things done.

I'm sharing with you my second card I made today.  I'm just loving how this one turned out!
Lots of pink and purple here which makes it very girlie, but I just love it!  One thing that totally amazes me is that there are 4 different patterned papers on this card!  I struggle to get 2 to match a lot of times, so to get 4 is huge for me!!

The image is Pedi Party from Sassy Studio Design.  I colored her in with pencils and added some glossy accents to the bubble bucket.  One thing I have longed to try is stitching on my cards.  I just love looking at what everyone else can do with their sewing machines on their cards!  But I've been too scared to try...and too lazy to pull out my sewing machine...so I did some pen stitching around my image instead :)  I think it turned out pretty good.  Yeah, not fancy or anything, but still cute.
I added some dots of white paint in the corners and sprinkled clear glitter over them so that they sparkled.  Then printed off my sentiment tag and it was done!  I'm really loving this card!  It turned out so much sweeter than I had expected it to!

This card is entered in the following challenges:
    Sassy Studio Designs #120-Sketch
    Incy Wincy Designs #142-Digis Only
    Stamp, Scrap & Doodle-Pastels

Thanks for stopping by!!

5 Fabulous Comments:

Recycled Project

Hello everyone!  I'm a little late getting my post up today for our Tuesday Throwdown challenge...haven't been feeling all that great so it's been hard getting mobilized :)

This week's challenge at Tuesday Throwdown is "Recycling".  This could be re-purposing a box, reusing materials, using recycled materials...etc!  So for my project, I chose to re-purpose one of my cricut cartridge boxes.  I have been wanting to do this for so long, but never sat down and took the time to complete this task.  I'm so glad I did it!  I just love the outcome!
I'm not completely done with the box...I still have to add details to the inside, but I totally love the outside!  I cut out some spiral roses and quilled them up with my "poor mans" quilling tool :)  Then I layered them on a different shaped flower and added some foliage.  I took some light blue stickles and swipped it around the tips of the roses so that they glittered.
With my box, I made a card to go inside!  I plan on making a set...but haven't finished them yet :)
The image on the card was provided by our sponsor this week-Meljen's Designs!  It's such a cute image, along with all of their images!  I colored it all in with colored pencils and mounted it on a scallop frame cut from my cricut Lacy Labels cartridge.  I added some dimensional foam to the back to pop it up off the card.  Then I punched out some daisy shapes (actually my husband punched them out for me...I was too weak :) ), glued them together and attached it to the sentiment tag.  The final touch was some blue paint dots covered in tiny beads!
This project is entered in the following challenges:
    Card Patterns Sketch #161
    Craft Your Passion #106-Die Cuts and Punches
    Lexi's Creations #63-Use Your Punches and Dies
    My Craft Spot #52-Make it Pop
    The Corrosive Challenge #147-Hit the Bottle

Thanks for stopping by and be sure to join us this week at Tuesday Throwdown!!

5 Fabulous Comments:

Spoil Yourself!

Happy Monday!!
I hope everyone had a great weekend!  Mine was pretty uneventful and relaxing...I love being able to just snuggle up on the couch with my husband :)

Today's card is one I am so proud of!  I took a little risk with the color combination, but it turned out so awesome!
Originally I had everything lined with green card stock, but that ended up being way, way too much green.  So I took the chance, and switched it to pink, not really knowing how well the green paper would look mounted on pink.  I think it looks fabulous!  The whole card is so girlie but yet the pinkness of it is toned down by the green :)

The image is Bubble Bath from Sassy Studio Designs.  I paper pieced the tub to match the background paper and then colored the rest of the image in with colored pencils.  I added some glossy accents to the bubbles and watch splash.

The layout follows the Sweet Sunday Sketch.  I cut out a scalloped border with my cricut and layered it with a pink dotted paper and white ribbon with a bow.

Then I decorated the interior to match the front.
The sentiments are typed out in word and printed from my computer.  I used my white gel pen and added stitching around the inside panel.

This card is entered in the following challenges:
    Sweet Sunday Sketch #156
    Party Time Tuesdays #63-Water
    Little Red Wagon-Spring Colours
    Paper Crafting Journey #7-3 or more Patterned Papers
    Card Makin Mamas-Make it Girlie
    Delicious Doodles #17-Loads of Layers
    Prairie Fairy #76-Anything Goes
    Stamptacular Sundays #159-Anything Goes

Thanks for stopping by!

4 Fabulous Comments:

Close to my Heart

Happy Friday everyone!
It has been one of those weeks for me...I have hardly had time to make any cards and everything seems to be going wrong!
My card today was for the Sketch Saturday challenge...and I don't even know if I've posted this in time to enter the challenge...but I wanted to share it anyhow!
 I used the Tiddly Inks image Wryn-Close to my Heart for this card.  I love that image!  It fits so many themes and is just wonderful!  I colored her in with my colored pencils, and added glitter to the wings.  The papers are all digital papers that I printed off and mounted on pink cardstock.
I cut out a fluted rose with my cricut and staggered 3 layers.  Then put some gold paint in the center and covered with tiny beads.  I punched out some hearts and made 2 "buttons" and then put a couple of gold paint dots next to the hearts.
It's a simple card, but I think it turned out so cute!!
This card is entered in the following challenges:
    Sketch Saturday #202
    Totally Stampalicious-Celebrating Friendship
    Celebrate the Occasion #58-Just Because with pink

Thanks for stopping by!!

5 Fabulous Comments:

Miss You!

Hello everyone and happy Tuesday!
Today I am sharing my second card for my guest designer spot at Tuesday Throwdown!!!  This weeks challenge number 93 is to use stick pins on your project!
I absolutely love how this card turned out!  I never really thought that orange and blue would look all that good together, but I'm glad I took the risk because I love it!  All of these papers are from my scrap drawer which makes it even more amazing how well they go together :)
The lacy edged panels I cut using my Cricut Holiday Cakes cartridge.  I ran the orange pattern paper through my cuttlebug, embossing it with the D'vine Swirls folder, then dabbed a little orange ink around the edges and on top (mostly to help cover the white that broke through :) ).

The center label is cut from the Lacy Labels cartridge and then embossed with the Swiss Dots folder.  I printed off the heart frame that was provided by this weeks sponsor-MyGrafico for the design team at Tuesday Throwdown.  It's printed on glossy photo paper...I'm trying different papers for my stamps and digital papers to see if they will provide better quality printouts than just regular card stock.  While the image printed great, I'm not sure I like the shine that glossy photo paper makes...

The sentiment is a cut file I created and then cut with my cricut, shadowing it with a white outline.  I then ran over the edges of the blue letters with a blue colored pencil to help outline it and give it an edge against the white...without that outline, it just looked blah...it took me awhile to figure out what the problem was. I kept looking at the sentiment, knowing something was wrong but couldn't put my finger on it right away :)
I cut the flower and swirls out with my cricut, inked the edges of the petals and layered them together.  Then I placed a large dot of orange 3D paint in the middle and sprinkled some tiny beads to cover the paint.  To help mimic that shimmer from the beads and pull it into the rest of the card, I covered some stick pin tips in glue and then rolled them in the tiny beads as well.  I love how they turned out!  It gives them a unique edge instead of just being a pearl on the end of a pin.

For the final touch, I added some small orange dots to the corners of the blue paper and sprinkled them with tiny beads as well.

I hope you will join us this week at Tuesday Throwdown!
This card is entered in the following challenges:
    Sunday Sketch and Stamp #101-Sketch
    Lexi's Creations #62-Focus on Your Sentiment
    Paper Pretties-Lots of Layers
    Totally Paper Crafts #111-Bingo (Flowers, Die cut, Blue)
    Delicious Doodles #16-Textures

10 Fabulous Comments:

Know Your Roots!

When I was younger, the one game that I owned and played repeatedly was the original Super Mario Brothers.  I had that game memorized!  I knew every level by heart and where all the hidden treasures and tunnels where.  It was my favorite to play and still is.  I'm not sure I could remember exactly everything but I don't think it would take long for it to all come back to me.

So when my game developer husband mentioned making cards based around video games, obviously Super Mario Brothers is the first place my mind traveled to.  I had a lot of fun making this card!  It definitely took me back to my gaming roots.

I followed the sketch at Mojo Monday this week:
I struggled to figure out what I could do with this sketch.  I'm not sure why it threw me for a loop...it just did :)
But when I finally got my brain working, I was so happy with the result!
Okay, okay...so I stretched the sketch a little :)  But all the elements required are there!  I'll explain :)  You can see the layered papers match the sketch, and the strip of stars are what I used instead of a scallop border.  Those are cut from my Cricut Birthday Bash cartridge, and I used my white and blue gel pens to stitch lines around each star.

The question mark treasure box represents the "flower" icon in the sketch.  To make that box, I just cut out a couple of squares and layered them appropriately on top of each other.  I cut out a question mark with my cricut, and then used my eyelet tool to punch out a few small circles for the corners.  Then I covered it all in a nice layer of glossy accents.
The large circle in the middle of the sketch I represented with the star and it's associated swoosh :)  The star is a cut file I made and then cut out several layers so it was really thick.  Then covered that in glossy accents as well.  The swoosh I drew out and cut myself.  The bottom layer is a piece of white cardstock.  Then there is a small yellow strip in the middle, and the top is a vellum layer that I covered with some adhesive and glitter glue.  The adhesive helped to keep the vellum from crinkling all up when I applied the glue.

The last item was the sentiment, which I used to represent the banner on the sketch.  I downloaded the Mario Brothers font and printed out the sentiment on my computer.

This card is entered in the following challenges:
    Mojo Monday Sketch #235
    Critter Sketch #109-Stars
    Divas by Design #29-Anything Goes
    The Pink Elephant #142-Clean and Simple

Thanks for stopping by!

3 Fabulous Comments:

Baby Giraffe

Hello everyone!  Thanks for stopping by my blog today!
My card today is one that has a lot of elements that I love on it, but I'm not sure how I feel about the card over all...
I really love all the parts of the card, but I'm not sure if I like them all put together...
I tried my hand at paper piecing...I think it turned out okay but I don't think the leopard print pattern paper I used was the best choice.
The black papers are both wonderful papers individually but I think putting them together just made the card too busy.  I Love the damask paper, it was a purchase for some birthday invites I finished a few weeks ago and I've been dying to use it on a card...I'll have to try again :)
Using pink as my alternate color I think was a great decision as it helped to brighten the card up with all the black.  The pink striped paper in the middle was from my scrap pile and it was the perfect size to place as the divider between the two black papers.  I put a small piece of pink ribbon through the middle of it, though it's hard to see...
The heart frame is from My Grafico and I mounted it on a scallop oval cut with my Cricut Lacy Labels cartridge.  I then embossed that scallop oval with my Swiss Dots folder for some texture.
The cute little giraffe I got with my winnings from Sketches by Carly a few weeks at Bugaboo.  It's just such a cute image!!  Perfect for baby cards.  With the paper piecing, I cut out all the little hearts, colored them with pink colored pencils and then put some pink glitter glue over top so they sparkled.  For the large heart and her tail, I spread some pink 3D paint over them and then covered the paint with some tiny beads for their own unique kind of shimmer.
I cut out some flowers in pink and the leopard print paper, swiped my pink marker over the bottom layer from some additional color, and then layered them, finishing them off with a pink gem center and glitter glue.
Cut out a small flourish, added some paint dots for some detail on both the flourish and the upper corner, and stuck a few pins in the flowers and it was done!

The more I look at the card...the more it grows on me :)

This card is entered in the following challenges:
    Card Patterns Sketch #159
    Craft Your Passion #104- Dots and Stripes
    Cupcake Craft #186-Sewing Box
    Paper Pretties-April Showers Bring May Flowers
    Ladybug Crafts #57-Spots and Stripes
    Party Time Tuesdays #62-Flowers
    Crafty Ribbons #16-Black/White +1 Other Color

Thanks for stopping by!

12 Fabulous Comments:

A first for me!

Yay it's Tuesday!  That means I get to share my exciting news!  I was contacted by a challenge blog that I participate in to be their guest designer this month!!!!  That is so exciting to me!  It helps me know that my hard work is noticed by others too!
So for the month of April, I am the guest designer at Tuesday Throwdown!!!  Thank you so much to Davi for contacting me!

This week the challenge there is Pastels.
This week's sponsor is Robyn's Fetish who also provided the absolutely adorable Angie Angel image I used on my card.  I colored her in with my colored pencils and added glitter to her wings, bow and the flower.
I layered 2 patterned papers behind her, following the sketch at Sketches by Carly.

The green panel is embossed with the Spellbinders Flower Silhouette template to help mimic the flower that Angie is holding :)  I added a green flower ribbon and bow, and then made some of my favorite "buttons!"  Can you tell I love making those?  They seem to be my current obsession.  Once those buttons were dry, I stuck them in the corners and the card was done!

I hope you will join us this week at Tuesday Throwdown!  Be sure to stop by to check out all the DT's wonderful projects!!!

This card is entered in the following challenges:
    Sketches by Carly Sketch #53
    The Crazy Challenge #113-Spring
    Daisy Doodles #56-Spring
    Stamp, Scrap & Doodle-Spring
    Stamptacular Sunday #157-Playin with Pastels

Thanks for stopping by!!

8 Fabulous Comments: