Swinging By-Once Again!

Wanted to get this card posted real quick before I call it a night.
This is such a sweet card!  I love how simple it is, and yet says so much!
The image is Cricus Trixie from Saturated Canary.  I just love these images!  They always seem to be perfect for every occasion!  I colored her in with my colored pencils and added some glitter detailing around so she sparkled :)  Always have to have the glitter!
Both frames that the image is mounted on are cut from my Cricut Lacy Labels cartridge.  I inked the edges of the green layers, and outlined the purple to cover up the interior white of the paper.
Then I made some buttons!  I just love them!  I cut out a bunch of little circles, glued 5 layers together and punched out some small circles with my eyelet tool.  Then smothered them in glossy accents and left them to dry!
Once they were dry, I stuck some purple ribbon behind them and attached them along the frame of the image.
The sentiment is one I found online, typed it out in word and printed it right onto my patterned paper.  Not sure I really like how it looks, but it was something new to try and I think it will work sometimes, I just have to play around with it to see how it works best.

This card is entered in the following challenges:
    Saturated Canary #14-Thinking of You
    Sweet Sunday Sketch #155
    The Crazy Challenge #112- Add a Sentiment
    Crafts 4 Eternity #65-3 of a Kind
    Pattie's Creations #40-Anything Goes

Thanks for stopping by!

6 Fabulous Comments:

Adore!

Happy Friday!!!
I hope this post finds everyone well!  The sun is shining nice and bright here in Montreal (after 2 days of snow...)!  Hopefully warmer weather is on its way.
Today's card was meant to be an anniversary card, but just going by the front, it could be for anything really :)
See what I mean?  Could be an I love you, wedding, anniversary, just because...etc! 
I started off with the sketch from Card Patterns this week.  I added a panel in the back that's been embossed with the Swiss Dots folder.  The frame is cut from my Cricut Lacy Labels cartridge.
The image is another Sans Designs image (I found their link!!), but I removed the birds that were originally on the ends, and added some wire butterflies that I bent in half so they were positioned sideways like they were holding the banner.  I colored the banner in with my colored pencils and added some gems to the tops of each flag.
The paper that the rosette is made from was the original paper I was going to use for this card.  But the darkness and shimmer of it made it really hard to get the elements to work with it.  I think it looks great as a rosette embellishment though!  So I chose a different, more subtle patterned paper  :)  Of course, it had to be blue because that will always and forever be my favorite color even if other colors periodically become my temporary favorites :)
I cut out a flourish I made with my cricut and then added a few handmade "heart pins" that I smothered in 3D paint and glossy accents.  I also added glossy accents to the heart on the banner.
There is a blue ribbon strung under the frame and then I made a little bow with the same ribbon to add to the center of the rosette.
This card turned out so much cuter than I expected!  I love when that happens!!

This card is entered in the following challenges:
    Card Patterns Sketch #158
    Digi Designs-Emboss It
    Stamptacular Sundays #156-3 B's-Blue, Butterflies, Bling!
    Die Cuttin Divas #58-3 R's-Rosettes, Ribbon, Rhinestones!
    Digital Tuesday #153-Favorite Color
    Cardz TV #105-You've Been Framed
    Simon Says-Anything Goes

Thanks for stopping by!  I have a great announcement coming next Tuesday so come on back!

10 Fabulous Comments:

Flowers and Butterflies!

I'm back with another Mother's Day card!
It was loads of fun making this card!  I think my color focus has shifted to purple now...3 of the last 6 cards I've posted have been purple...oh well!
I started this card by first punching out the border at the bottom with my Martha Stewart page punch.  This card was wonderful in helping me use up a bunch of my random scrap pieces that are just odd sized and difficult to regularly use.  The paper used for the border and butterfly were these long 1 1/4 x 12 inch pieces of paper that I had left over from a Christmas gift...they already had adhesive on the back of them and I didn't realize it until after I punched it...but it worked out great for sticking it down.  The adhesive was already cut to the right shape!
The flowers are cut from templates I made following a few flower designs from the Cricut Mother's Day Bouquet cartridge.  I cut several layers, decreasing the sizes as I went, then inked the edges in purple, pinched or rolled them and glued them all together.  The centers are cut from pearled paper and then completed with a small pearl.
I printed off the digi sentiment and wrapped it with a white ribbon and attached a small bow.
The final step was adding all the paint dots.  I'm still practicing my consistency with their size :)

This card is entered in the following challenges:
    Try Stampin' On Tuesday Sketch #59
    The Pink Elephant #141-Butterflies
    Tuesday Throwdown #91-Outside the Box (extend an element outside it's frame)
    Stampin' Sisters in Christ #132-Use Everything!
Thanks for stopping by!

8 Fabulous Comments:

Bunny and Eggs

Hello and welcome to my blog!
Today's card is such a cutie!
Isn't that image absolutely adorable!?  I loved coloring it and cutting it out...so so cute!  The image is from Sans Designs, but I can't seem to find the link for it now :(  I printed it 3 times, then cut out the ruffle frame on 2 of the copies, glued them together and then popped them up on the full image so it created sort of a frame shadow box effect.  I think it worked out pretty good!
The larger paper in the background is from Designs by Krista for a spring blog train.  I loved this paper and have been dying to use it on a card!  The striped paper is from Eye Inspire, which was also involved in that same spring blog train :)  I really love using digital papers.  There are so many freebies on the net and it makes it easier choosing what I want instead of sifting through bins at a craft store (which there aren't very many craft stores in Montreal...so digital paper for me is a lifesaver :) ).  My only problem with printing these digital backgrounds is they never turn out as nice, clear and crisp as they appear on the screen, or the way designer paper is from the store...

Do you have any suggestions on how to get these papers to print better?  I know I don't have the greatest printer in the world to print papers with, but I can't afford a really nice one right now.  I've also tried researching if using different card stock would work...but I couldn't really find any information on that either...
So if you print digital papers, what card stock do you use?  Do you set up specific settings on your computer so they print at a better quality?  Any advice in this area is appreciated :)

Ok back to the card :)
 I layered everything on cream card stock with purple as the final frame.  There are 2 pieces of ribbon stacked on top of each other and run under the image.  I tied a small bow with the purple ribbon and stuck it at the top of the framed image.  Then I cut out a banner in purple, added some purple stitching and placed that on top of the ribbons.
I took some shimmery 3D paint and added varying sized dots to all the corners. Put some final touches of glitter on the image and it was done!

This card is entered in the following challenges:
    The Sweet Stop Sketch #151
    The Crafter's Cafe #2-Ribbon or Lace
    Lexi's Creations #61-Easter
    Totally Stamplicious-Critters
    Paper Crafting Journey #5-Pretty Pastels
    Stamp, Scrap & Doodle-Bunnies
    The Squirrel and the Fox #14-Easter
    Dream Valley #28-Easter
Thanks for stopping by!!!

12 Fabulous Comments:

Mother's Day

It's been a lazy weekend for me...the weather has turned cold and rainy here in Montreal, so any outdoor activities I wanted to do have been put on hold...so I escaped to my craft room :)
I just received my batch of Saturated Canary images in my email last night and could not wait to dive in and make something with them.  I just loved this fairy image, she seemed so whimsical.
I've had this peachy orange paper in my stash for awhile.  Every time I thumb past it I remind myself to use it but never remember it's there or I pass right over it for one of my more common color choices.  Well, I pulled it out today.  I just love it!  I love that it is double sided and the 2 patterns go together so well.  Sometimes when a paper is double sided, I don't feel like the 2 patterns really compliment each other, but that's not the case here!
I followed the sketch over at Sketch Saturday.  It has a lot of elements on the sketch, which make the card really fun!
The frame around the fairy is cut from my Cricut Lacy Labels cartridge.  I added some green shimmer stitching around the image for added detail.  The scallop border at the bottom is a cut file from Birds Cards.  I think that has become my new favorite border cut.  It's not too fancy but not boring either, which is usually perfect for any card!
Fantabulous Cricut's challenge this week is flowers, and Card Makin Mamas challenge is buttons...but since I don't have any buttons right now (I should really try to get some :) )  I decided to make my own!  I cut out a flower shape from the Create-a-Critter cartridge, layered it 5 times and then added a peach patterned paper on top for a total of 6 paper layers.  Then I used the smallest eyelet punch I have and made little button holes in all of the "buttons."  Once that was done, I took my Glossy Accents and covered the whole thing with a thick layer.  I think they turned out pretty good!  I will have to keep trying that out with different button shapes.
Once the buttons were dry, I strung some green cord through the centers and taped them down.  Originally I had bows tied on all the buttons, but all the loops and tails make it look very chaotic and messy...so I chose to just string them through the center and omitted the bows.
I added some paint dots across the bottom and on the scallop border and then sprinkled some clear glitter on top so they sparkled.  There is also some glitter glue added to the fairy's wings.
Such a cute card :)
This card is entered in the following challenges:
    Sketch Saturday #200
    Fantabulous Cricut #103-Celebrate Spring
    Digital Tuesday #152-Life is Peachy
    Card Makin Mamas-Buttons
    2 Sisters Challenge #84-Spring is in the Air
Thanks for stopping by!

6 Fabulous Comments:

2 More Cards!

I'm back for my second post today!  I love getting cards done, makes me feel productive :)
This card I actually completed 2 days ago, but just put the finishing touches on it to fully complete it.
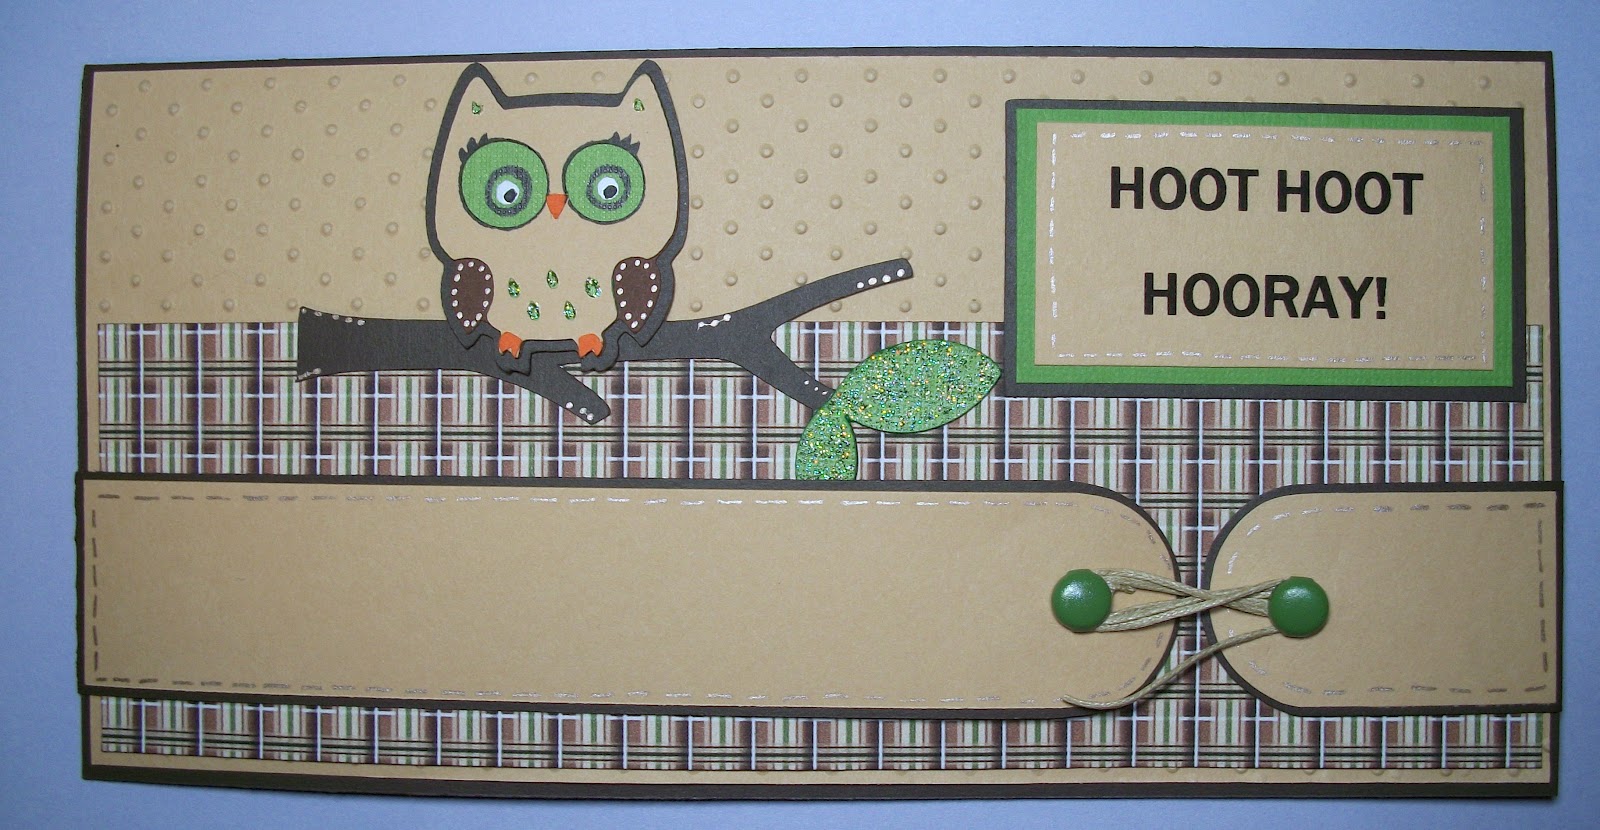
It's a pocket card that, originally, was going to be a graduation card, but I decided to leave off the graduation cap so it wasn't specific to just graduation.
I cut the owl from my Cricut Create-a-Critter cartridge, drew in the eyes and added green glitter to it's feathers and the leaves of the branch.
For the strap across the front, I got the idea from an image I found on Pinterest, but didn't pin it and now can't find that item...so I had to go from memory.
I realized after putting it all together that buttons would have worked better for the string tie than brads...but I don't have any buttons so I did the best I could with the brads.  I left a little gap underneath them so the cord would fit when wound up.
Once the string is unwound, the straps open up and the card flips open.
I forgot to make some "fake money" so I used a piece of journal paper to represent the money pocket :)
I added some brown stitching to the scalloped border to give it some detail.  This card turned out great, and I really like it!  I hope to make more of them for other occasions since it's so cute!
This card is entered in the following challenge:
    Charisma Cardz #11-Pocket Card

For my next card, I went black and white with a touch of color:
It's a really simple card, but so elegant :)  I cut out the black frame around the image with my cricut and then used some scalloped scissors on all the panels to mimic the black frame.
I colored in the bluebell image with my pencils, then added some silver paint dots around the frame and on the sentiment panel.
I added a butterfly from my awesome find at the dollar store.  Had a little trouble getting it attached...since it's normally on a stick, there ends up being a knob on the back causing there not to be a flat part to attach to the card.  So I used some liquid glue to attach a small piece of cardstock so that would create a flat surface.  I realize now that using hot glue would have worked better...but pulling out my glue gun would have been a lot of work...I chose the lazier route :)
This card is entered in the following challenges:
    Pixie Cottage #113-Sketch (Easter/Spring)
    My Craft Spot #49-Spring Scallops
    Celebrate the Occasion #55-Welcome Spring
    Stampin' Sisters in Christ #131-Spring

Thanks for stopping by and have a great weekend!!

10 Fabulous Comments:

Purple Thank You

It's been a very productive day for me today!  Unlike yesterday which was...not...
The Thank You card that I am showing you in this post was so much fun to make!  It was a last minute decision to make for a challenge that, at the time, had 2 hours left on it.  So I was running against the clock which is what I think made making this card so much fun!
I just love it!  It's kind of mish-mash parts that are from my hoarded stash but it all seems to look so darn good together!  I used the Canary Love image from Saturated Canary.  She has so many wonderful images.  This little doll was a gem to color in, even if I was rushing :)
 The frame around her is cut from my Cricut Lacy Labels cartridge.  I used a doily cut from my file stash that I had previously created and tucked that behind the frame to add detail to my sentiment.
I cut out a large daisy flower, layered them up, glittered the middle petals and stuck a pearl in the middle.
Then I rolled some of my roses up, added some glitter and stuck them in the random arrangement they appear in :)
 The final touch was the glitter around the canary's string and the purple paint dots for added details :)
This card is entered in the following challenges:
    Sketch Saturday Sketch #199
    One Stop Craft #174-Handmade Flowers
    My Time to Craft #175-Doilies and Flowers
    Tuesday Throwdown #90-Spring Cleaning (the background papers have been in my scrap stash forever!)
    Pixie Dust Studio #119-Your Favorite Things (all of it!  lol...I love my flowers, glitter of course, and the 3D paint dots are always a must on my cards)
Thanks for stopping by!
(more posts to come shortly, so come on back later!)

3 Fabulous Comments:

Baby Blessings

Happy Wednesday!
It has been a super productive day for me today.  I got 5 cards done!!!  That is amazing for me, I'm usually lucky if I get 2 done!  (I get distracted a lot :) )
3 of the cards today were not very detailed at all.  I tried my hand at clean and simple...very clean and simple:
But I just LOVE how it turned out!  I got my inspiration from Christy's clean and simple card style at Tiddly Inks.  I loved the idea of not having anything else on the card front to take away from the focus of the image and sentiment.  So I gave it a shot!
I used the image Pregnant Pinup from Sassy Studio Designs.  I just love their images!  I colored her in with my colored pencils and attempted to give her redish highlights :)  It was a fun change from the usual brown tones I use.
I didn't plan on adding the squares around the outside of the card, but when I penciled them in to see what they would look like, I just loved them.  So I used my paper trimmer as my guide and tilted a couple lines around the whole card.  Then added a few green and silver gems to some extra bling :)
It's such a sweet card!  I really like doing this style card (I made 2 other styles :) ).  So I definitely think I will keep doing them!
This card is entered in the following challenges:
    Lawnscaping Challenge-Inspired by a Fellow Crafter
    The Stamping Boutique #30-Clean and Simple
    Little Red Wagon #125-Clean and Simple
    Delicious Doodles #15-Wonder of Life
    Stamp, Scrap & Doodle-Green and White
Thanks for stopping by!

14 Fabulous Comments:

Piggy Birthday

Feels like I'm getting my groove back :)
One of our close friend's birthday is this weekend, so I decided to make him a birthday card using one of my new Bugaboo stamps!
Seems like green and yellow have been my new go-to colors...they must remind me of summer and I am definitely ready for that!
Both the background papers were from a freebie pack over at Leaving a Legacy.  I love finding digital paper sets because then the papers already coordinate and I don't have to try and do the matching myself :)  I thought these papers could work well for a male birthday card.
The pig image is cut out at about 3 inches, and I used my cricut to cut out the frame...I can't remember where I downloaded that frame from...it was awhile ago before I really started making sure I labeled everything I got from other sites...
The banner is cut from the Cricut Birthday Bash cartridge.  It had a birdie on one corner that I trimmed off.  Then I layered on some yellow flags and added some cord and bows across the top as well as criss-crossed under the image.
I printed off the birthday swirl sentiment which is just from about.com and cut it out with my Lacy Labels cartridge (when don't I use this cartridge? :) ) with a yellow frame.  Went back through and added some white dot details to finish it off!
I think it turned out really cute.  The darker colors in the background didn't print off very crisp and clear...I don't exactly have high quality cardstock to print on or a fancy printer for that sort of stuff :)  But it still looks good :)
This card is entered in the following challenges:
    Seems a Little Sketchy #9
    The Crazy Challenge #111-Go Green
    Simon Says-A Bit o' Green
    Crafty Ribbons #15-Birthday
    Birthday Sundaes #48-Animal Birthday Card

6 Fabulous Comments:

Service to the Lord

Finally back to making card!  It was a busy couple of weeks for me as I had both a large order from Etsy and my first invitation order!!  I was very excited to have so much to do, but missed just sitting down and making a card.  Repeating the same design over and over again can get a little stale, but still loved it :)
For todays card, my stepmom had asked me to make some "Thank you" cards focusing on their work for the Lord.  I wasn't totally sure what to do when she asked for these, but then as I was scanning through the stamps at Our Daily Bread, found the perfect sentiment!
It's a 4 x 4 card, which was a new size for me to make.  I typed up the sentiment, printed it off and then cut out all the frames from the Cricut Lacy Labels cartridge.  I thought the shape of this frame matched perfectly with the patterned paper that I had chosen!
There is a panel along the side that has been embossed with a dots folder and then layered on black cardstock.  I cut out a scalloped border from the Holiday Cakes cartridge and put a small piece of ribbon across the top of it.
Pulled a couple of my quilled roses from my stash to place over top of the bow, then added the butterfly.  I found these butterflies at the dollar store!    I thought they were so cute, I bought several packs of them!  They came on long picks but I cut that off and then adjusted the wire frame so it was straighter and not so crunched.
I'm very happy with this card!  The black and white color scheme looks so good together and everything just flows!
This card is entered in the following challenges:
    Pixie Dust Studio #118-Sketch
    Celebrate the Occasion #54-Any Occasion, Use Metal (my butterfly)
    Deep Ocean #21-Butterflies
    Sentimental Sundays #94-Use Metal + Sentiment (my butterfly)
    Ladybug Crafts-Anything Goes
Thanks for stopping by!

9 Fabulous Comments:

Heard You're "Dragon"

Yay!  It's Friday!!  I'm very glad this week is over!
Still trying to work through my frustration from yesterday, so I went pretty simple on this card.  A few people had commented that they look for sketches to follow and everything falls into place...well I usually do follow sketches, but I've been trying to force elements to work with a sketch and that I think is where my frustration comes from most times.  So I decided to choose a sketch and let it "speak" to me.  And while it is simple, I think it worked out pretty well:
The green background paper is actually the paper I was trying to force to work with my card yesterday.  I'm glad I kept it around because it worked so well with this card!  The image is a freebie that I got from Crafting Moments Cardmaking.  It's colored with my new pencils!  Was so excited to get new ones as my original set of 12 were getting pretty worn down :)
 I added some glitters around the dragon's spine and the blanket, along with the steam from the soup.  I just love this image!  It was so fun coloring it too.  As each piece was colored, it was like the image came to life.
The yellow panels are embossed with the snake folder from the Cuttlebug Animal Prints pack.  They are mostly hidden but I thought that went along pretty well with a dragon...something other than swirls and dots.
The sentiment was a freebie from Create with TLC.  It's printed at about 1 1/2 inches and then cut out using my Cricut Lacy Labels cartridge.  I edited it slightly to remove the "Feel Better Soon" line, which will be added to the inside of the card once I get that decorated.
I was shocked to find a green button in my embellishment drawer!  Buttons are not something I keep on hand...not sure why since they are very popular for cards...I just never find myself purchasing buttons...but I had just the right one for this card!  I layered it onto yellow ribbon and strung some green cord through the middle for a second bow.
This card is entered in the following challenges:
    Sketches by Carly #51
    Paper Makeup #26-Clean and Simple
    Paper Pretties Monday Challenge-Green
    Crafting for all Seasons #22-Yellow and Green
    Card Makin' Mamas #40-Green
    Raise the Bar #95-Go Green
Thanks for stopping by and your continued support :)

7 Fabulous Comments:

Friendship

Happy Thursday to everyone! What a week this has been...
I first want to welcome my new followers!  Thank you to everyone now following my blog and for all of your wonderful comments!  They keep me going when the inspiration starts to lack, like it did this week.

All week I have been struggling with all these wonderful ideas in my head that seem so beautiful and perfect and I start to make one of them...and it stalls...I can't find the right paper...or my colors don't match...or the whole thing just looks awful...it's so frustrating!  So I turn to other blogs for inspiration...and see all the other beautiful projects everyone else has made and I get upset that what I make, in my mind, doesn't ever seem to be that good!  Ugh!  Am I being petty?  Does anyone else have that problem?  I'd like to know that I'm not the only one that goes through this...

Anyway...that problem came up with my card today.  It originally started out with green colors.  But again, I couldn't get any greens to match and none of the elements I was using worked in the colors I had chosen...it was frustrating and I had a moment of weakness but then I pulled myself together, turned to my scraps pile to see what papers I had in there that matched and started churning on this:
While I do love how this card turned out, there are things I feel should have been done differently.  The embossing on the scallop circle shouldn't have been inked...that blue doesn't match very well so when I look at the card my eyes draw to the bright blue swirls instead of enjoying the beauty of the roses and sentiment.  In my attempt to dull that down, I made little rose buds and stuck them behind the bow, but they are hard to see and the greenery around them takes over and sort of drowns the little white buds...
The big roses I had quilled up yesterday just playing around.  My wonderful husband broke down and made me a 'poor mans' quilling tool (he cut the ends off a long needle and wrapped the stem in duct tape :) )  It works quite well and is much easier than trying to use my fingers :)
So tell me (if you wish), do you struggle with card ideas?  What process do you take for making a card-theme then colors then elements, or elements then colors then theme?  Or something totally different?  I'm just curious how others go about their card making crafts :)

This card is entered in the following challenges:
    Mojo Monday Sketch #231
    Kaboodle Doodles #109-Think Spring, Include Flowers
    The Pink Elephant #138-Lots of Layers
    CES Challenge #75-Flower Frenzy
    Stamp, Scrap & Doodle-Use Your Stash

Oh forgot to tell you where the parts came from :)  All the frames were cut from the Cricut Lacy Labels cartridge.  The scalloped border under the ribbon is a cut file from Birds Cards.  The roses are a scallop cut file I created myself after looking at several designs and tutorials :)

Thanks for stopping by!!

4 Fabulous Comments:

Pinteresting!!

Happy Thursday everyone!!
Today's card is one that I have been thinking about ever since I saw the challenge topic for this week at Crafts 4 Eternity.  I have been mulling over the sentiment in my head but hadn't been able to figure out what details to add around it for the card...until today!
I saw a picture online while doing some browsing and the idea just stuck like glue and I knew exactly what I was going to make:
 The topic at Crafts 4 Eternity is Social Media...and right now what is more social than Pinterest???  Of course, my inspiration came from this card I saw while doing my daily browse of the crafts on that very site:
While I didn't follow too many of the same details, what really caught my eye was the vellum window with the butterflies.  I was kind of scared doing the string and everything because I've never tried to do anything like that before, but I think it turned out okay on my first try.  There are a lot of things I learned while making this card, and I think I am going to try and remake it using some of my new found knowledge...like don't put double sided tape on an edge that will be exposed...
I'd like to add a frame around the window like the example as well...I just forgot when making my original.
The card shape and the window frame are cut from my Cricut Lacy Labels cartridge.  The butterfly is cut from the Create-a-Critter cartridge and I added glitter to her wings.
The flowers are ones I had cut out quite awhile ago for a different project, and then never used them.  The colors were a perfect match for this card and they were the right size to fit on the string, so I added them!
I printed off my sentiment and added it to a Lacy Label and then put some paint dots and glitter around the edge.  Made up a couple of paint dot pins to go along with my "pin"terest theme and stuck them behind a flower/bow.
So cute!
This card is entered in the following challenges:
    Crafts 4 Eternity #60-Social Media
    Paper Pretties Monday Challenge-Rainbow (it's not your traditional rainbow...more of a pastel..still works right?)
    The Cuttlebug Spot-Spring is in the Air
    Deep Ocean #20-Spring
    Party Time Tuesdays #57-Anything Goes
Thanks for stopping by!  Now go do something pinteresting!!! lol :)

5 Fabulous Comments: